 Skip to content
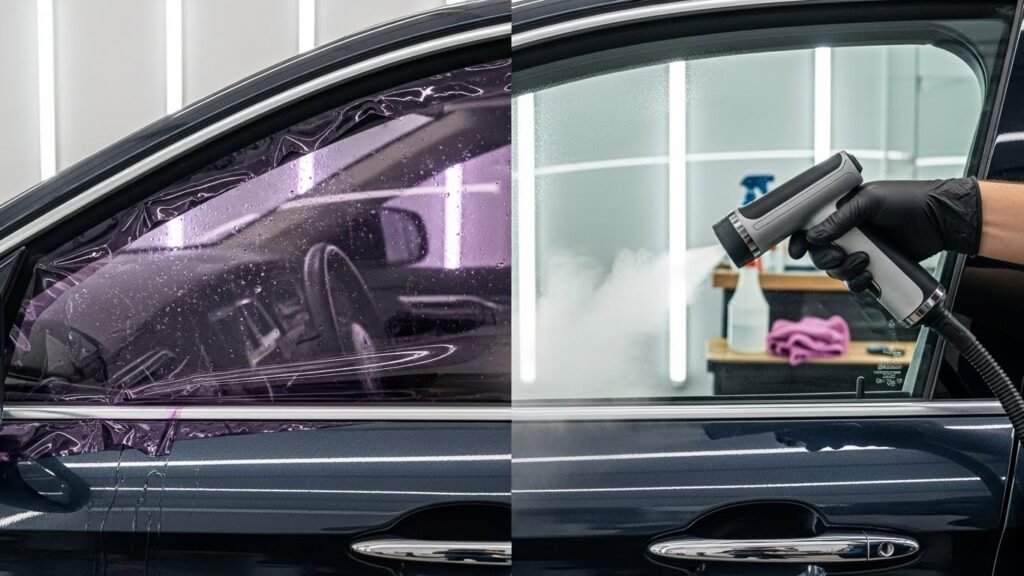
Learning how to remove tinted glass on car windows is a skill every car owner should have. It might look like a huge mess, but you can totally handle it. This guide will walk you through every single step of the process. You will find out which tools work best for your specific car. We will also talk about when you should just call a pro for help. Get ready to turn those bubbly windows into crystal clear glass once again.
Understanding Window Tint and the Need for Removal
Window tint is basically a thin sandwich of plastic and glue stuck to your glass. Most people think it is just a dark sticker, but it is much more complex. The film has layers that block heat and UV rays from hitting your skin. Over time, the sun beats down on these layers and breaks them apart. This is why old tint starts to look purple or gets those weird bubbles.
The glue used for window tint is designed to stay stuck for a very long time. It creates a molecular bond with the glass so it does not fly off. When you want to take it off, you have to break that bond carefully. If you just rip it, you will leave a sticky disaster behind. Understanding how this glue works is the first step to a clean window.
Window film goes through a lifecycle just like any other car part. High-quality film can last a decade, but cheap stuff dies much faster. Heat and humidity are the biggest enemies of your car window tint. They make the polyester layers brittle and cause them to flake off. Knowing the age of your tint helps you choose the best removal method.
- The Anatomy of Window Film: Most films have a hard top coat to prevent scratches.
- The Science of Adhesion: Pressure-sensitive glue keeps the film attached to the glass surface.
- The Lifecycle of Window Film: UV rays eventually rot the plastic and make it fail.
Why People Remove Window Tint
One of the most common reasons to learn how to remove tinted glass on car windows is because it looks bad. Bubbles and purple colors are signs that the film is totally dead. It makes a nice car look like a total junker. Bubbles also make it really hard to see out of the window at night. This can lead to accidents because you cannot see other cars or people.
Legal issues are another big reason why drivers decide to strip off their old tint. Every state has different rules about how dark your windows can be. If you move to a new state, your old tint might get you a ticket. Police use a special tool to measure the light coming through your glass. Taking it off yourself saves you from paying a heavy fine later on.
Sometimes you just want to upgrade to better technology for your ride. Old dyed films only block light but they do not stop much heat. Newer ceramic films keep your car way cooler in the hot summer months. Removing the old stuff is the only way to get the new stuff on. It also helps your car sell for more money if the windows are clean.
- Deterioration and Aesthetics: Bubbles and fading are the biggest reasons for removal.
- Visual Impairment: Dark or distorted film creates dangerous blind spots for drivers.
- Legal Compliance: Most states have strict laws on how dark tint can be.
- Vehicle Resale Value: Clean glass makes a used car look much newer to buyers.
- Upgrading Technology: New ceramic tints block more heat than old dyed films.
Understanding Different Types of Tint Material
Not all tints are created equal, and some are harder to remove than others. Dyed window film is the most common type you will find on older cars. It is usually the one that turns purple and gets very brittle over time. Since it is basically just plastic and dye, it tends to flake off easily. This makes it a perfect candidate for a DIY removal project at home.
Metalized film is a bit tougher because it has tiny bits of metal inside. These metal particles help reflect heat, but they also make the film much stronger. When you try to peel it, it might not tear as easily as dyed film. However, the metal can sometimes interfere with your cell phone or GPS signals. Many people remove it for this reason and switch to ceramic options.
Carbon and ceramic films are the top-tier choices for modern vehicles. They are very thick and hold together well even when they are very old. Because they are high-quality, the glue they use is usually much stronger too. You might need more heat to get these films to release from the glass. They are expensive, so you want to be extra careful not to scratch them.
- Dyed Window Film: This is the cheapest type and often turns purple.
- Metalized Film: Contains metal bits that can block your phone signal.
- Carbon and Ceramic Films: These are the best for blocking heat but have strong glue.
How Long Does Window Tint Last?
You might wonder why your tint is failing so early compared to your friend’s car. The average lifespan for most window films is between five and ten years. If you bought a cheap tint job, it might only last three years. Quality brands usually offer a lifetime warranty because their materials are much better. It really comes down to what you paid for in the beginning.
Where you live plays a huge role in how long your tint stays fresh. If you live in a place like Arizona or Florida, the sun is brutal. Constant UV exposure will cook the film and ruin it much faster than in the north. Parking in a garage can help extend the life of your window tint significantly. The shade protects the glue from getting too hot and melting.
How you clean your windows also matters more than you might think. Many people use glass cleaners that have ammonia in them, which is a big mistake. Ammonia eats through the top layer of the tint and ruins the bond. Always use ammonia-free cleaners if you want your tint to last for a decade. Keeping the edges clean also prevents the film from peeling up early.
- Average Lifespan Expectations: Most films last 5 to 10 years depending on quality.
- The Role of Geographic Location: Hot, sunny climates ruin tint much faster than cold ones.
- Chemical Interference: Using ammonia cleaners will destroy your tint very quickly.
Risks of Improper Tint Removal
If you don’t know how to remove tinted glass on car windows correctly, you can mess things up. The biggest risk is scratching the glass with a sharp metal razor blade. Once a window is scratched, you cannot really fix it without replacing the whole thing. This is a very expensive mistake that is easy to avoid if you are careful. Always keep the glass wet when you are using a blade.
The back window is the most dangerous part of the car for this job. Most cars have tiny copper lines on the back glass for the defroster system. If you scrape over these lines with a blade, you will break the circuit. Then your defroster will never work again, which is a nightmare in the winter. You have to use steam or chemicals on the back window instead of scraping.
You also have to worry about the inside of your car while you work. The chemicals and water you use can ruin your leather seats or door panels. Modern cars have a lot of electronics inside the doors that do not like water. If you are not careful, you could short out a window motor or a speaker. Always cover your interior with towels or plastic sheets before you start.
- Physical Glass Damage: Metal blades can leave permanent scratches on your windows.
- Defroster Line Integrity: Scraping the back window can break your heating system.
- Interior Damage: Water and chemicals can ruin your seats and electronics.
- Health Risks: Breathing in ammonia fumes or glue remover is bad for you.
Essential Tools and Materials for Success

To get the job done right, you need the proper gear in your garage. A high-quality steamer is the best tool for removing tint safely. It uses hot moisture to melt the glue without getting the glass too hot. If you don’t have a steamer, a heat gun or a hair dryer can work too. Just be careful because heat guns can get hot enough to crack the glass.
You will also need some sharp tools to get the edges of the film up. New stainless steel razor blades are great for the side windows only. For the back window, you should use plastic scrapers or specialized plastic blades. These will not cut through your defroster lines like metal ones will. Having a good utility knife is also helpful for cutting the film into smaller sections.
Don’t forget the cleaning supplies to get rid of the leftover sticky mess. A spray bottle filled with soapy water is your best friend during this process. You can also use specialized adhesive removers like Goo Gone or simple rubbing alcohol. Microfiber towels are essential for wiping everything down without leaving lint behind. Make sure you have plenty of them ready to go.
- Heat Sources: Steamers are best, but heat guns or hair dryers work too.
- Cutting and Lifting Tools: Use stainless steel blades for sides and plastic for the back.
- Chemical Agents: Adhesive removers, ammonia, or alcohol help dissolve the glue.
- Lubrication and Cleaning: Soapy water in a spray bottle is a must-have tool.
- Personal Safety Gear: Wear gloves and goggles to keep chemicals out of your eyes.
Preparing Your Workspace for Removal
Before you start, you need to set up a good place to work. You should never try to remove tint in direct sunlight if you are using chemicals. The sun will make your cleaners dry up before they can actually do any work. A shaded garage or a cool driveway is the perfect spot for this project. Good lighting is also very important so you can see every bit of glue.
Protecting the inside of your car is the next big step in the plan. Take some old towels and stuff them into the cracks of the door panels. This will catch any soapy water or chemicals that run down the window. You can also use masking tape and plastic to cover your speakers and power window buttons. A little bit of prep work now will save you from a huge cleanup later.
Finally, give the outside of your windows a quick wash with some regular glass cleaner. You want to be able to see through the glass clearly to check your progress. If the outside is dirty, you might miss some spots of glue on the inside. Once the car is clean and protected, you are ready to start the removal process. Make sure you have all your tools within reach before you begin.
- Environmental Control: Work in the shade so your chemicals do not dry out.
- Interior Protection: Use towels and plastic to keep your seats and doors dry.
- Surface Preparation: Clean the outside of the glass so you can see the tint clearly.
DIY Window Tint Removal – Step-by-Step Guide

The first thing you should do is the peel test to see what you are dealing with. Try to pick at a corner with your fingernail to see if it comes off in one piece. If it flakes into tiny bits, you have a long day ahead of you. If it stays together, the process will be much faster and easier. This test tells you exactly how much heat you will need to apply.
Step one is all about applying heat to loosen the bond of the glue. Hold your steamer or heat gun a few inches away from the corner of the window. Keep the heat moving so you do not burn the film or crack the glass. After about thirty seconds, the glue should start to get soft and gooey. This is the perfect time to move on to the next step.
Step two involves using your blade to lift the very edge of the film. Be very gentle and try not to scratch the glass as you do this. Once you have a small tab lifted, grab it with your fingers or some pliers. Slow and steady is the secret to a clean peel that leaves less glue behind. If you feel it getting stuck, just add a little more heat to that area.
- Step 1: Loosening the Bond: Use heat to soften the glue before you try to pull.
- Step 2: The Critical First Inch: Carefully lift a corner with a blade to start.
- Step 3: Constant Tension Peeling: Pull at a 45-degree angle for the best results.
- Step 4: The Glue Ghosting Phase: Look for the invisible residue left on the glass.
- Step 5: Final Glass Polishing: Use a clean towel to make the window shine like new.
Advanced DIY Methods: Which One is Best for You?
The Steamer Method (The Gold Standard)
The steamer method is widely considered the safest and most effective way to remove tint. The hot steam goes right through the film and hits the glue directly. This makes the glue release its grip on the glass much faster than dry heat. It also keeps the film pliable so it does not snap into pieces while you pull. Professionals use this method because it works every single time without damaging the car.
The Heat Gun or Hair Dryer Approach
If you do not want to buy a steamer, a heat gun is a solid alternative. It provides much more heat than a hair dryer, which speeds up the whole job. However, you have to be really careful not to melt the plastic door trim. Always keep the gun moving and never stay in one spot for more than a second. If the glass gets too hot to touch, you should back off and let it cool down.
The Solar Ammonia and Black Trash Bag Method
This method is pretty cool because it uses the power of the sun to do the work. You spray ammonia on the window and then cover it with a black trash bag. The black bag absorbs heat from the sun and creates a “sauna” effect for the tint. The ammonia fumes break down the glue while the heat softens the plastic layers. After an hour or two, the tint usually peels off in one giant sheet.
The Soapy Water and Scraper Method
This is the most basic way to learn how to remove tinted glass on car windows. You just soak the window in soapy water and start scraping with a fresh razor blade. It takes a lot of elbow grease and time, but it is very cheap to do. You must keep the window soaking wet the entire time to avoid making scratches. This method is only for side windows and should never be used on the back.
Specialized Techniques for Rear Windows and Quarter Glass

Rear windows are the trickiest part of the whole car because of the defroster lines. These lines are painted onto the glass and can be easily scraped off by mistake. You should almost always use the steamer or the trash bag method for the back glass. If you must scrape, only use a plastic blade and go very slowly. Never use a metal razor blade on any window that has these heating elements.
Quarter glass windows are the small, triangular pieces found on some car doors. They are hard to clean because they are so small and tucked into the corners. You might need to use a smaller steamer attachment or a tiny plastic scraper for these. Since they are small, the glue can sometimes be extra stubborn in the tight edges. Take your time and make sure you get every little bit out of the corners.
- The No-Blade Zone: Never use metal blades on windows with defroster lines.
- Vertical vs. Horizontal Scraping: Always follow the direction of the defroster lines.
- The Scrub Pad Secret: Use fine steel wool or nylon pads for safe cleaning.
Deep Cleaning: Removing Persistent Adhesive Residue

Once the film is gone, you will probably see a bunch of sticky glue left behind. This “glue ghosting” can be really annoying if you don’t have the right chemicals. Spray your adhesive remover or soapy water onto the glass and let it sit for a minute. This gives the liquid time to soak into the glue and soften it up. Then, use a clean microfiber cloth to start scrubbing it away.
If the glue is really stuck, you might need to use a scrub pad or some fine steel wool. Make sure the steel wool is “0000” grade so it does not scratch the glass surface. Keep the glass wet while you scrub to provide plenty of lubrication for the pad. You might need to repeat this process two or three times to get it perfect. Run your hand over the glass to feel for any bumps or sticky spots you missed.
- Solvent Selection: Use Goo Gone, alcohol, or soap to break down the glue.
- Dwell Time: Let your cleaners sit on the glue for a minute before scrubbing.
- Agitation Techniques: Use a scrub pad in circles to lift the sticky residue.
Environmental and Disposal Considerations
Removing window tint creates a lot of sticky trash that you need to handle properly. The old film and glue-covered towels should be put into a sturdy trash bag. If you used ammonia or heavy chemicals, make sure the bag is sealed tight. You don’t want those fumes leaking out into your garage or your house. Try to dispose of the waste according to your local city rules for chemicals.
If you are worried about the environment, try to use more natural cleaning options. Vinegar and water can sometimes work on lighter glue, though it takes more effort. Steam is the most eco-friendly way to remove tint because it only uses water. It avoids the need for harsh chemicals that can be bad for the planet. Being mindful of the materials you use makes the project better for everyone.
When to Choose Professional Window Tint Removal
Sometimes, learning how to remove tinted glass on car windows shows you that the job is too big. If your tint is flaking into a million tiny pieces, it might take you all weekend. A professional shop has specialized tools that can do the same job in an hour. If you have a luxury car with very sensitive electronics, it might be worth the extra cash. They have insurance in case anything goes wrong during the process.
The cost for a pro to remove your tint usually ranges from $100 to $300. This depends on how many windows you have and how bad the tint is. Many shops will give you a discount if you are getting new tint installed at the same time. If you value your time more than the money, calling a pro is a smart move. You get a guarantee that your windows and defrosters will stay in perfect shape.
- The Brittleness Threshold: If the film breaks into tiny bits, call a pro.
- Integrated Window Electronics: Modern cars with smart glass need expert care.
- The Value of a Warranty: Pros offer guarantees that DIY projects do not have.
Choosing the Best Window Tint Removal Service Near You
If you decide to hire a pro, you need to find a shop you can trust. Look for a place that specifically mentions tint removal as one of their main services. Read online reviews to see if other customers had their defrosters damaged or interiors ruined. A good shop will be happy to explain exactly how they plan to remove the film. They should also give you a clear price quote before they start any work.
It is also a good idea to visit the shop and see how clean their workspace is. A dirty shop often leads to a dirty job on your car windows. Ask them if they use steam or chemicals for the removal process. Most top-tier shops prefer steam because it is the safest for your vehicle. Choosing a local expert ensures you have someone to talk to if you have questions later.
Common Mistakes to Avoid During Removal
One of the biggest mistakes people make is working too fast. If you rip the film off quickly, you will leave almost all the glue on the glass. This makes the cleanup process take ten times longer than it should. Another common error is using a dull or dirty razor blade on the windows. A dull blade is actually more likely to slip and scratch your glass or your hand.
Many people also forget to protect their car’s interior from the soapy water. Water can seep into the door panels and cause mold or electronic failures over time. Always use more towels than you think you need to keep things dry. Finally, never try to scrape your tint off when the glass is bone dry. This is the fastest way to leave permanent marks on your car windows.
- Working in Direct Sunlight: This makes your cleaners dry too fast to work.
- Using Old Razor Blades: Dull blades are dangerous and can scratch the glass.
- The Dry Peel Trap: Never try to peel cold or dry tint off your windows.
Final Thoughts – DIY vs. Professional Tint Removal
Knowing how to remove tinted glass on car windows can save you a lot of money. If you have the patience and the right tools, it is a very satisfying project. Most people can handle the side windows without any major issues. Just remember to take your time and use plenty of heat and water. Your car will look brand new once that old, bubbly film is finally gone.
If the back window makes you nervous, there is no shame in asking for help. Protecting those defroster lines is the most important part of the entire job. Whether you do it yourself or hire a pro, the goal is clear, safe glass. Now that you have all the secrets, you are ready to tackle those windows like a boss. Good luck with your project and enjoy the view from your clean windows.
Frequently Asked Questions About Removing Car Window Tint
Can I use a pressure washer to remove car window tint?
Using a pressure washer is not recommended because the high-pressure stream can damage the window seals and force water into your car’s electrical components. It is also largely ineffective at peeling the film compared to targeted heat or steam.
Will WD-40 help remove the sticky glue left behind?
Yes, WD-40 is a popular household solvent that can break down window tint adhesive. You should spray it on a cloth first rather than directly on the glass to avoid getting oil on your interior trim.
Is it safe to use a metal scraper on a Tesla or luxury car window?
Extra caution is needed for luxury vehicles because many have acoustic laminated glass that is softer than standard tempered glass. It is much safer to use a plastic razor blade or a specialized scraper to avoid deep scratches that are expensive to fix.
How do I remove window tint from a curved windshield?
Curved glass requires you to work in smaller sections to ensure the heat stays consistent across the bend. If you pull too fast on a curve, the film is more likely to snap or tear into small pieces.
Can I use a clothes iron instead of a steamer?
You should never use a clothes iron directly on car glass as it can cause the window to shatter due to uneven thermal expansion. Steamers are designed to release moisture safely without the risk of high-pressure physical contact.
Does vinegar work as well as ammonia for the trash bag method?
Vinegar is a safer, non-toxic alternative, but it generally takes much longer to break down the adhesive than ammonia. It is a good choice if you are sensitive to strong chemical smells or have kids and pets.
What is the best way to remove “security” window film?
Security film is much thicker than standard tint and often requires significantly more heat to soften the heavy-duty adhesive. You may need to cut the film into narrow vertical strips and peel them one by one.
Can removing tint damage the window’s “dot matrix” edges?
The dot matrix is a raised texture on the glass that can trap adhesive. If you scrape too hard, you can flatten or chip these dots, so it is better to use a soft brush and solvent in these areas.
Is there a specific temperature that is too cold for DIY tint removal?
If the temperature is below $50^\circ F$, the adhesive becomes very brittle and the glass is at a higher risk of cracking from a heat gun. It is best to wait for a warmer day or work inside a heated garage.
Can I use a magic eraser to get the glue off?
A magic eraser is slightly abrasive and can be very effective at scrubbing away softened glue residue. Just ensure the glass stays lubricated with soapy water to prevent any fine dulling of the surface.
How do I remove tint that was applied to the outside of the window?
Exterior tint is usually a temporary protection film and should be peeled using a heat gun. Since it is exposed to the elements, it might be more “baked on” and require a stronger adhesive remover.
Will a steamer damage my window’s rubber weatherstripping?
If you hold the steamer too close to the rubber for a long time, it can cause the seals to warp or soften. Keep the steam nozzle moving and try to keep it focused on the glass rather than the trim.
What should I do if the tint comes off but the top layer stays?
This is called “delamination,” and it means you need to re-apply heat and start the peel again from a different corner. You basically have to treat the remaining clear layer as if it were a new piece of tint.
Can I use acetone to clean the windows after removal?
Acetone is a powerful solvent that cleans glass well, but it will instantly ruin your car’s plastic dashboard or door panels if it drips. It is generally safer to stick to isopropyl alcohol for DIY projects.
Is it normal for the windows to look “foggy” right after removal?
Yes, this is usually just a thin layer of leftover adhesive or cleaning chemical residue. A thorough cleaning with a dedicated glass cleaner and a microfiber towel will clear it up.
How do I remove tint from windows with “aftermarket” defroster kits?
Aftermarket kits are even more fragile than factory-installed ones. You should avoid all scraping and only use the “soak and steam” method to protect the thin foil elements.
Can I use a hairdryer on the “high” setting for the whole job?
A hairdryer can work, but most household models will overheat and shut off before you finish all the windows. They also don’t get deep enough into the glue, making the peel much harder than a steamer would.
Will sunlight alone be enough to remove the tint?
Sunlight can help the “trash bag” method, but it is rarely enough to remove tint on its own without a chemical catalyst or extra steam. You still need the moisture to help the glue release its grip.
Can I remove tint if my window regulator is broken and the window is stuck?
It is very difficult to remove tint from a window that won’t move because you cannot access the top edge. You should fix the window motor or regulator before attempting to strip the tint.
Is it okay to use steel wool on the front windshield?
You should never use steel wool on the front windshield as it can interfere with the way light hits the glass and cause glare. It can also damage the specialized coatings found on modern windshields.